
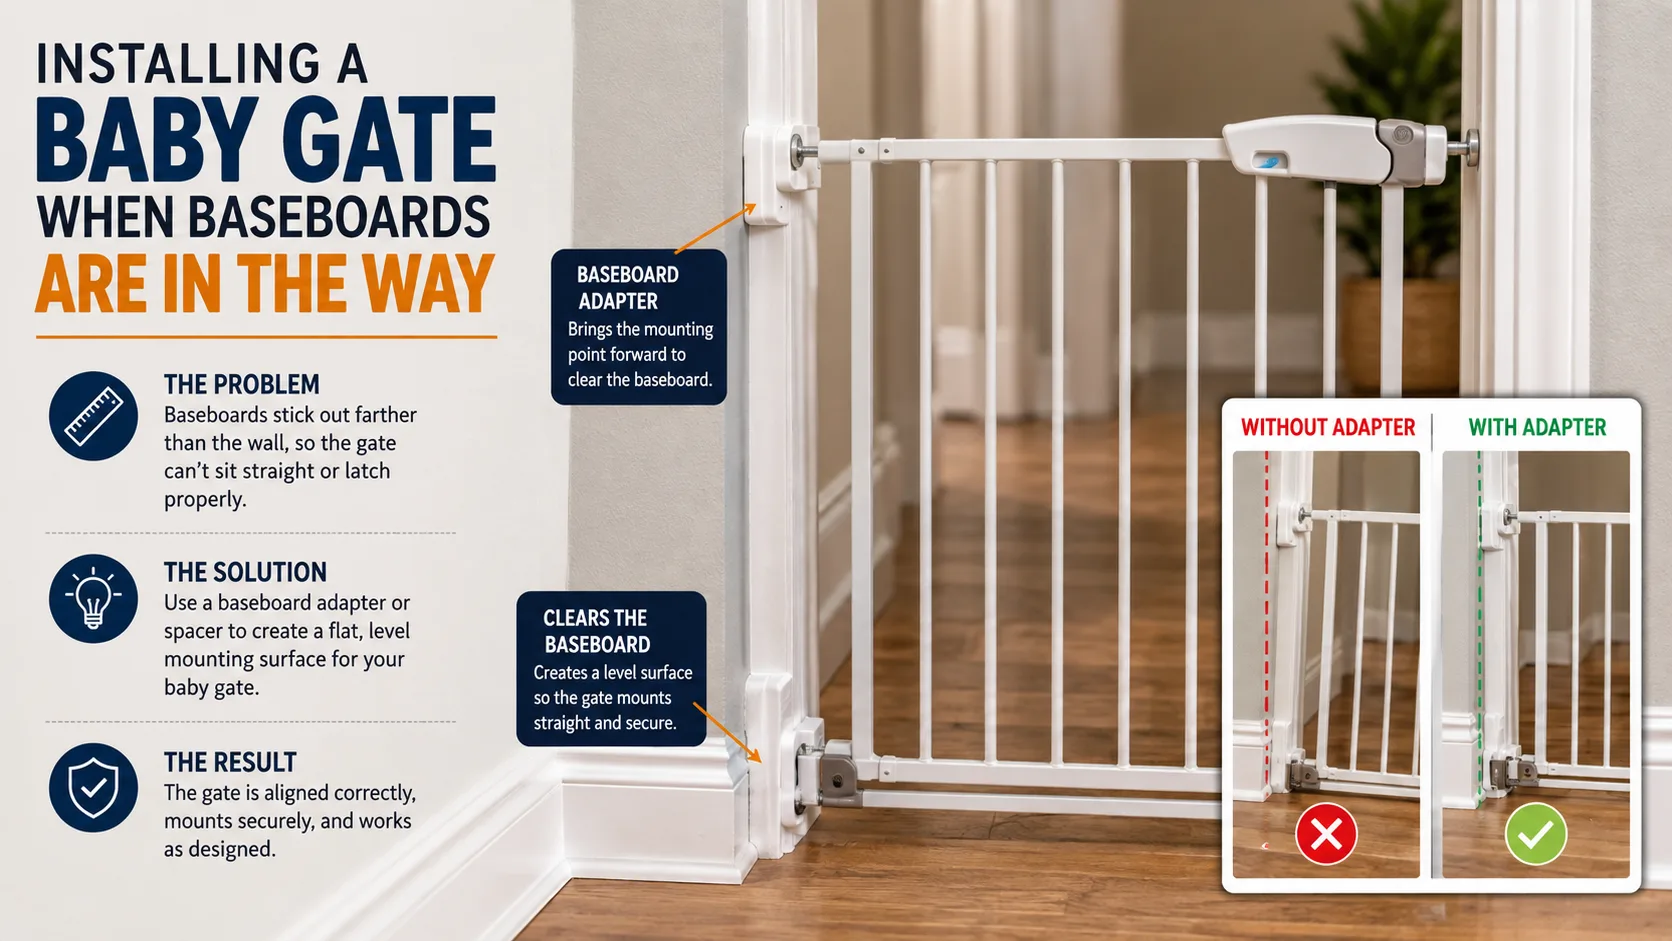

A baby gate can fit the width of a doorway perfectly and still be difficult to install because of the baseboards.
The problem is simple: the baseboard pushes the bottom mounting point farther into the doorway while the upper mounting point sits against the flat wall. If the gate is tightened against those two different surfaces, it may lean, twist, latch poorly or fail to sit the way its manufacturer intended.
The safest solution is not to force the gate into the opening. First identify how your gate is supposed to be mounted, then use a manufacturer-approved or purpose-built baseboard solution if the trim prevents the mounting points from lining up.
Why Does a Baseboard Stop a Baby Gate From Sitting Straight?
Look at the wall from the side.
Above the baseboard, the wall is relatively flat. Near the floor, the trim projects outward.
A gate that has upper and lower mounting points therefore meets two different surfaces:
Upper mount → wall
Lower mount → projecting baseboard
Even a relatively small difference can change the angle of the gate.
You may notice that:
- one side looks vertical while the other leans;
- the latch does not meet cleanly;
- the bottom of the gate sits farther into the opening;
- pressure pads do not sit flat;
- the gate needs excessive tightening before it feels secure.
Those are signs that the baseboard needs to be accounted for rather than ignored.
Should You Mount the Baby Gate Directly to the Baseboard?
Not automatically.
Baseboard is decorative trim, and houses use many different materials and installation methods. A solid piece of wood firmly attached to framing is very different from thin MDF or trim held mainly by finish nails.
More importantly, the instructions for the specific gate determine where its brackets, wall cups or mounting hardware are supposed to go.
Avoid assuming that screwing into the baseboard is acceptable simply because a screw will go into it.
A better approach is to check whether the manufacturer provides:
- a baseboard adapter;
- a mounting kit;
- spacers designed for the gate;
- alternative mounting hardware;
- instructions specifically covering uneven wall surfaces.
Purpose-built universal baseboard kits are also available. For example, Cardinal Gates sells a baseboard adapter designed to create a level mounting surface above trim while attaching into solid wood or wall studs rather than requiring screws through the baseboard itself. The existence of these kits is useful because it shows what the real problem is: creating a properly supported, aligned mounting surface, not simply finding somewhere to drive a screw.
Compatibility still needs to be checked for the particular gate and opening.
What Should You Do If the Gate Is Going at the Top of the Stairs?
Treat this situation differently from an ordinary doorway.
The U.S. Consumer Product Safety Commission advises using only gates that screw to the wall at the top of stairs.
That means a baseboard should not lead you to substitute a pressure-mounted gate merely because it is easier to position.
If the trim prevents the required hardware from sitting correctly, the practical choices are usually to:
- use a compatible baseboard mounting system;
- reposition the mounting hardware only if the gate instructions specifically allow it; or
- choose a different gate that is suitable for that stair opening.
At the top of stairs, a gate that is almost level or “tight enough” is not a satisfactory workaround.
What About a Pressure-Mounted Gate in a Normal Doorway?
Start with the manual.
Pressure-mounted gates vary considerably. Some depend on wall cups or other mounting components in addition to the outward pressure created by the gate.
CPSC’s gate standard specifically addresses the ability of pressure-mounted gates to resist being pushed out, and wall cups can form part of the installation used to achieve that resistance.
Some manufacturers are very explicit about this. Regalo, for example, warns on several of its pressure-mounted gates that the supplied wall cups must be installed because the gate can otherwise be pushed out.
So if a baseboard prevents a wall cup or pressure pad from sitting flat, do not simply omit that part.
That is a sign that you need a compatible adapter, a different approved mounting arrangement, or possibly a different gate.
Can You Use a Homemade Wooden Spacer?
This is where caution is needed.
A wooden spacer may appear to solve the geometry because it brings the upper wall surface forward until it lines up with the baseboard.
But whether that arrangement is appropriate depends on much more than the thickness of the wood.
You would need to know:
- what the gate manufacturer permits;
- what the spacer is attached to;
- what hardware is required;
- whether the gate brackets can be mounted to that surface;
- whether the installation changes any required spacing around the gate.
For that reason, it is better not to copy a generic spacer measurement from another house or an online photo.
A 12 mm or 20 mm spacer that happens to work with someone else’s trim tells you nothing about whether it is suitable for your gate or your wall.
Where possible, use an adapter or installation method specifically intended for baby gates and baseboards.
What If the Baseboard Is Only on One Side of the Opening?
This often produces a gate that looks strangely twisted.
One side may meet a flat wall from top to bottom, while the other side meets the wall at the top and the baseboard at the bottom.
Do not deliberately tilt the opposite side to make both sides look similar.
Instead, solve the uneven surface on the side where the trim interferes.
Some baseboard adapter systems are sold individually for exactly this reason: one adapter can be used where only one side needs to be brought into alignment.
What If the Baseboard Has a Sloped or Decorative Top?
This can be more troublesome than a simple rectangular baseboard.
A pressure pad or wall cup may touch only the curved or angled edge rather than resting against a broad, flat surface.
Tightening the gate harder does not turn that into a better mounting surface.
It can instead:
- compress or damage the trim;
- cause the mounting point to slip;
- leave the gate visibly out of alignment.
This is another situation where an adapter that bypasses the shape of the molding can make more sense than trying to mount directly against it.
Do You Need to Cut or Remove the Baseboard?
Usually, that should not be the first solution.
Cutting the trim makes a permanent alteration to the room and may be unnecessary if a compatible baseboard mounting kit or different gate can solve the problem.
It is particularly unattractive in a rental, where modifying the molding may not be permitted.
Before cutting anything, check the gate manufacturer’s installation instructions and available accessories.
If the gate requires extensive alterations to make it fit, that is also worth treating as a sign that the particular model may not suit the opening.
How Can You Check the Gate After Installing It?
Do more than confirm that it stands upright.
Follow the manufacturer’s installation checks first, then look carefully at how the gate behaves during normal use.
Check that:
- all required brackets, cups and hardware are installed;
- mounting surfaces are flat where they are supposed to be;
- the gate is not visibly twisted;
- the latch closes completely;
- the locking mechanism works consistently;
- the gate does not shift when opened and closed;
- mounting hardware remains tight;
- there are no unintended gaps caused by the workaround.
Manufacturers may also require regular checks after installation. Regalo, for example, instructs users to inspect its gates periodically to make sure the hardware and mountings remain tightened.
If something begins loosening repeatedly, investigate why instead of simply tightening it again every few days.
Check the Gate Itself, Not Just the Installation
If the gate is secondhand, has been stored for years, or came from an unfamiliar online seller, check its model and recall status before relying on it.
CPSC has continued to recall child safety gates for problems including entrapment and fall hazards, including recalls issued in 2025 and 2026.
A perfect baseboard installation cannot make an unsafe or recalled gate suitable for use.
Also stop using a gate if parts are missing, damaged, or if your child can climb over or dislodge it, following the manufacturer’s age and use limits.
What If You Still Cannot Get the Gate to Sit Correctly?
Do not keep adding improvised pieces until the gate finally fits.
Measure:
- the opening width;
- the baseboard height;
- how far the baseboard projects from the wall;
- whether trim is present on one or both sides;
- the surfaces available for the required mounting hardware.
Then compare those measurements with the installation requirements for your gate or a gate specifically suited to that opening.
Sometimes the simplest safe answer is a different baby gate.
That is especially true when the opening combines several complications, such as a deep baseboard, a banister, an angled wall and a stair landing.
The gate should fit the architecture in a way its manufacturer expects. The architecture should not have to be improvised around an unsuitable gate.
If you are working through other hazards as your child becomes more mobile, the broader guide on how to childproof a house covers furniture, windows, electrical risks, kitchens, bathrooms, stairs and other areas that need attention.
For this particular problem, however, the key is much narrower: do not let the baseboard force the upper and lower gate mounts into an installation they were not designed for. Use the gate instructions, preserve every required safety component and solve the uneven wall surface with a compatible mounting method rather than extra pressure or guesswork.
